Water Rocket Pad Fill Accessory.
by Mike Passerotti
The idea is to pressurize a water jug and provide an outlet for the
water. The trick is to pump air into the top of the water jug
and prevent air from entering the water line.
Parts List:
|
Description |
Size |
Qty |
Price |
Source |
|
Water Bottle |
5 Gal. |
1 |
$15.00 |
Grocery Store |
|
CPVC |
1/2" |
22 1/2" Length |
$1.00 |
Hardware Store |
|
Sched 40 PVC |
1/2" |
6" Length |
$0.50 |
Hardware Store |
|
Sched 40 PVC Slip "T" Connector |
1/2" |
1 |
$0.19 |
Hardware Store |
|
Sched 40 PVC Slip Cap |
1/2" |
1 |
$0.72 |
Hardware Store |
|
Hose Clamp |
1" |
1 |
$0.74 |
Hardware Store |
|
Garden Hose |
9/16" |
48" Length |
|
Scrap |
|
Male Garden Hose End Repair Part |
9/16" |
1 |
$2.79 |
Hardware Store |
|
PVC Cement |
small can |
1 |
$1.49 can |
Hardware Store |
|
PL Premium |
Caulking Tube |
1 |
$3.95 tube |
Hardware Store |
|
Automotive Tire Valve Stem (All rubber) |
.453" Opening |
1 |
$1.00 |
Auto Parts Store |
|
Bailing Wire or electrical wire |
3 or 4" piece |
1 |
|
Scrap |
Tools Requirement:
PVC Pipe Cutter, Drill, 5/8" Drill Bit, 1/2" Drill Bit,
Flat File, Screw Driver, Knife (Or something suitable to cut a garden hose.)
Parts Preparation:
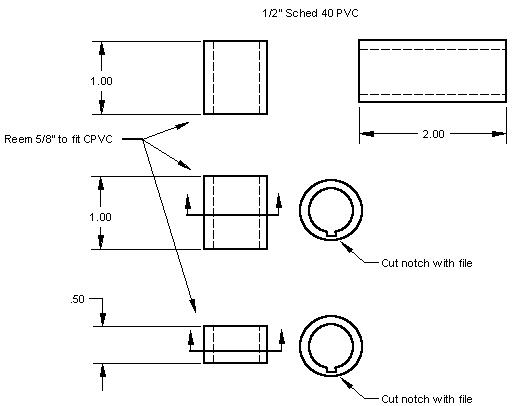
1/2" Sched 40 PVC:
A. Cut 1 piece 2" long.
B. Ream about 3 inches of PVC with the 5/8" drill bit.
C. Test the reamed PVC to make sure it slips over the CPVC
without major stress.
D. Cut 2 pieces 1" long, 1 piece 1/2" long of the
reamed PVC section.
E. Clean all parts. Using the flat file, cut the lip off
the ends so the parts will easily slip into the couplings and over
the CPVC.

F. With the flat file, notch the inside of one 1" piece
and the 1/2" piece. Cut about halfway through the wall of
the PVC.
1/2" CPVC:
Cut 1 piece 22 1/2" or slightly longer if desired. With
the flat file, cut the lip off the ends so that the 1/2" Sched
40 will slip over the ends.
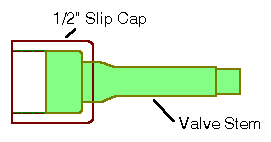
1/2" PVC Slip Cap:
Drill a 1/2" hole in the end of the cap. Insert the tire
valve stem with the threaded cap end on the outside.
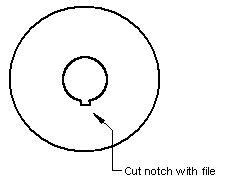
Water Bottle Cap:
Take the cap off the water bottle. Drill a 5/8" hole in
the center. With the flat file, notch one side of the hole in
the cap to match the notch in the PVC.
Water Hose:
Cut about a length of hose (preferably an old hose) any length that
is usable for your launch pad. About 3 to 4 ft length is
required to come off the top of the bottle, snake down to the hose
hookup and give a little slack to move the bottle out of the way
during launches.
Assembly:
Assembly should be done outside, with old clothes on because the PVC
cement and PL Premium are hazardous to work with. Make sure the
assembly area is uncluttered and you have clean up rags or towels
handy. Test fit pieces before gluing.
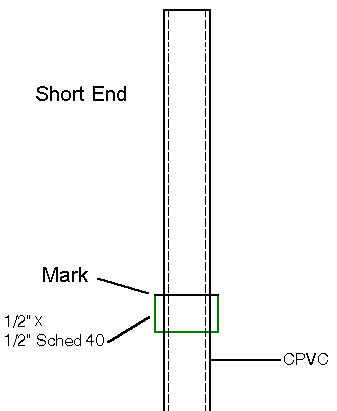
1. Mark the CPVC 18 1/2" from one end (or the depth of the water bottle). This line is
where the water bottle cap will go. Slide the 1/2" Sched
40 notched piece onto the CPVC and glue in place on the inside of the
mark. When gluing, don't put glue on the notch. The
notch must remain open for air to pass.
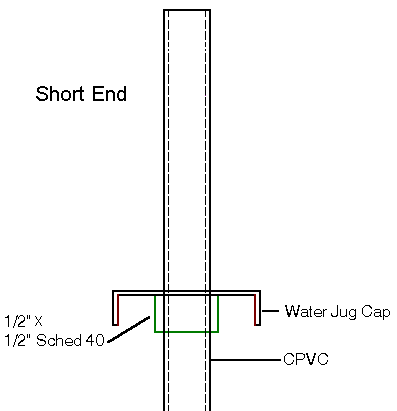
2. Slip the water bottle cap over the CPVC short end.
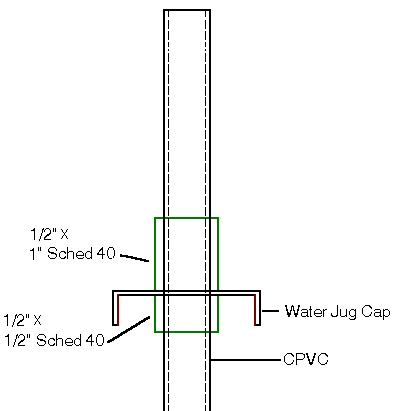
3. Slip the notched 1" length of Sched 40 PVC over the
short end and glue in place. Immediately after pushing together
the assembly, use the section of wire to help align the notches and
open the air passage. Remove the wire. Do not disturb the
alignment until the glue sets.
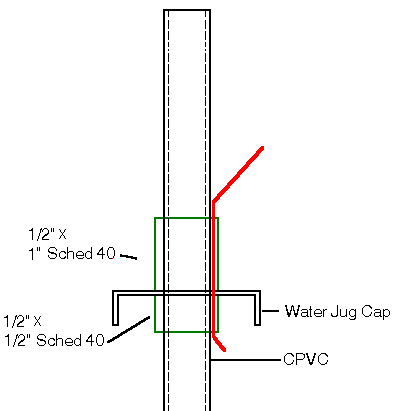
4. Glue the PVC "T" connector over the 1" Sched 40
piece. Be careful not to plug the air passage. You can run the wire
through the hole again if glue gets into it.
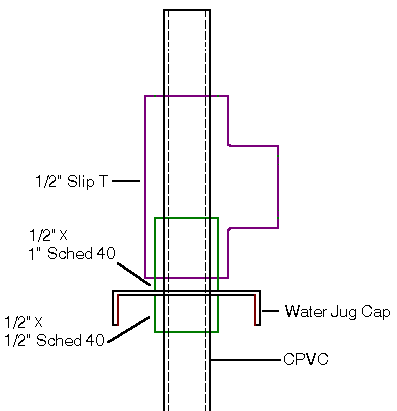
5. Glue the second 1" length of PVC over the CPVC and inside the
"T" coupling.
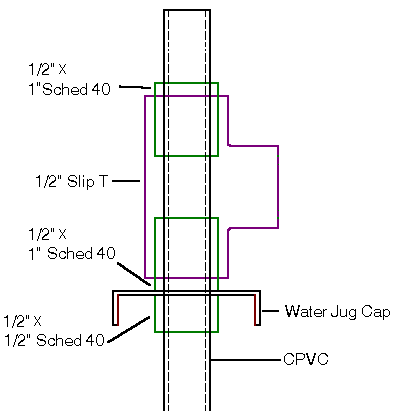
6. Glue the 2" length of PVC into the perpendicular port of the
"T" coupling.
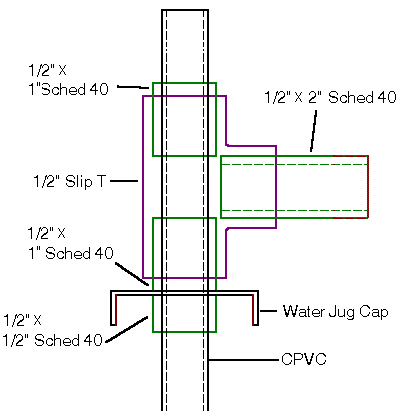
7. Glue the PVC cap with valve stem over the 2" piece of PVC.
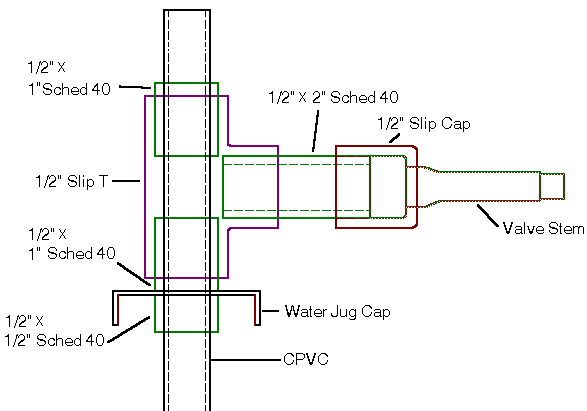
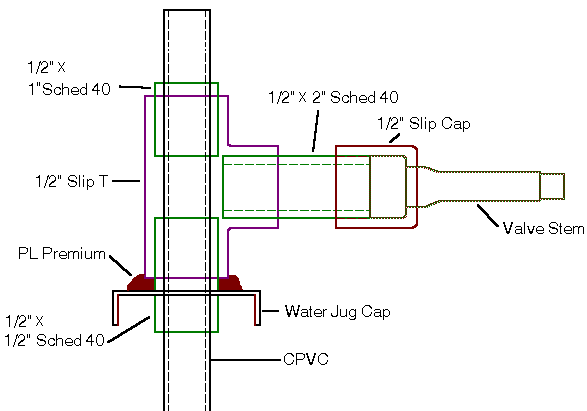
8. Spread PL Premium around the joint where the water jug cap meets
the 1/2" Sched 40 PVC. Let the PL Premium dry at least one day.
Two day drying time would be better.
9. Slide the hose clamp over the end of the garden hose. Push the
garden hose end over the CPVC above the "T". Clamp down the
hose real tight. Add the garden hose repair end to the other end of
the hose.
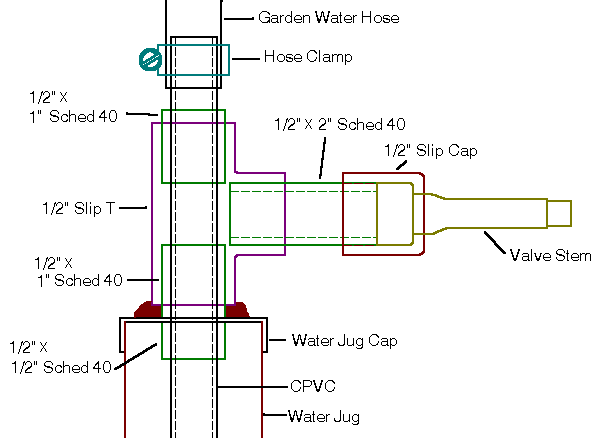
Final Assembly: Put water in the water jug, screw the cap assembly on
and its ready to use.
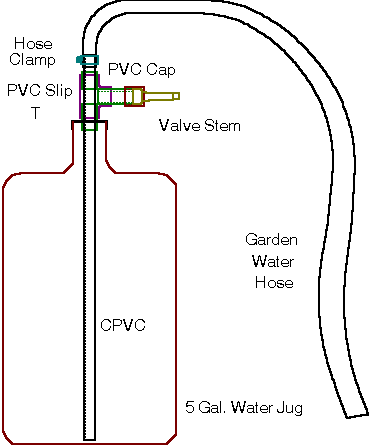
Usage:
Warning: The cap will not take much pressure. 40psi is good. The
cap is fragile so take care handling the setup. Do not lift the bottle
with water in it by the pipes on top.
Connect the garden hose to the launch pad. Close the water valve on
the launch pad. Pump up the water jug with a reasonable pressure
(about 40 psi).
(First time only) Open the valve on the launch pad to bleed the air out
of the line. Close the launch pad valve. Repressurize the water jug.
Place a rocket on the pad.
Open the water valve to fill the rocket to
the desired level. Close the water valve.
If the water level is below
the top of the launch tube, then bleed off the water in the launch tube.
You can bleed the water out by the air valve on the launch pad. The air
going into the pad will add more water (undesirable for controlling the water
level) to the launch pad as it bubbles over the top of the launch tube.
When adding water to the bottle, the bottle
will have some pressure which can be used to bleed off the extra water.
Launch the rocket.
When finished launching, make sure you bleed the pressure off of the
water bottle before disconnecting the garden hose.
Optional usage: Put a garden hose nozzle on the end of the garden
hose and fill rockets off of the pad in a controlled way.
Optional usage: Put a garden hose nozzle on the end of the garden
hose and soak the nearest person.
Feedback welcomed.
Note: I'm currently working on a pad fill rig that uses 2 liter bottles
all connected together in a manifold. Stay tuned.


